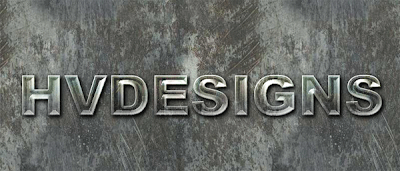
Today were going to be creating something a little bit different. Were going to be using a mixture of textures and layer styles to create the perfect looking rough metal style text.
What We’ll Be Creating

Lets Get Started
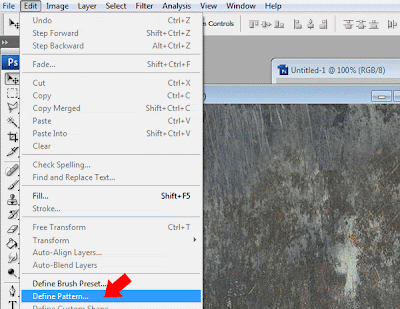
Create a new document 800 x 600 pixels with any background color. Download the “Metal Texture then open it in photoshop, once opened in photoshop go to “Edit > Define Pattern”.
Close the texture document window and go back to your original document. Fill your background layer with the metal texture by selecting the paint tool with the pattern fill type selected.
Adding The Text
Select the type tool then add your text to the canvas. Use a fairly big font type so the text stands out. Here are my settings.
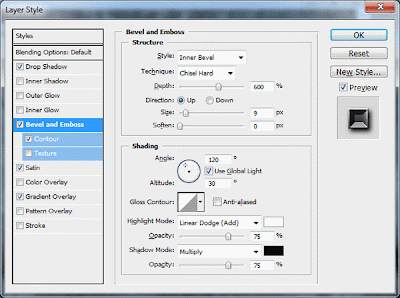
Once you’ve added your text add the following layer styles to your text layer.
You should have something like this.
Adding The Texture To The Text
Load a selection around your text layer by selecting the text and going to “Select > Load Selection” OR simply click the little thumbnail in the layers palette whilst holding down the CTRL key on the keyboard.
Create a new layer above your text layer then fill the selection with your metal pattern.
Now that you’ve filled the selection set the layer blend mode to screen and add a gradient overlay using the settings below.
You should have something like this.
Adding Depth To The Text
Load a selection around your text layer once again by selecting the text and going to “Select > Load Selection” OR simply click the little thumbnail in the layers palette whilst holding down the CTRL key on the keyboard.
Create a new layer above your textured text filled layer then contract the selection by 5px by going to “Select > Modify > Contract”.
Reset your background foreground layers to black and white then fill the selection with some clouds by going to “Filter > Render > Clouds”.
Now go to “Filter > Render > Difference Clouds”.
Finally set the layers blend mode to “Soft Light”, you should have something like this.
Adding The Rivets
Load a selection around your text layer once again by selecting the text and going to “Select > Load Selection” OR simply click the little thumbnail in the layers palette whilst holding down the CTRL key on the keyboard.
Create a new layer above all your layers then contract the selection by 6px. (Select > Modify > Contract) Keep the selection active and select your brush tool. Once you’ve selected the brush tool open up the brushes palette.
Select a brush size of 4.
Then set the brush spacing to 1000%.
Now open up the paths window by going to “Window > Paths”, at the bottom of the paths window click the little button which says “Make Work Path From Selection”.
Head back to your layers palette and make sure your new blank layer is selected. Select the pen tool and then right click on your canvas and go to “Stroke Path”. Right click again and go to “Delete Path”.
Add Some Style To The Rivets
With your rivets layer selected add the following layer styles.
You should have something like this.
Repeat the same process for your background layer to add the rivets to your background.
That’s it all done, hope you enjoyed this tutorial. I’ll look forward to your comments.


.gif)


